
Usage
Opening the AI Chat module
Navigate to Admin Tools > AI Chat in the TYPO3
backend. The module is available to all backend users
who have access to the Admin Tools section (unless
restricted via the allowedGroups setting).
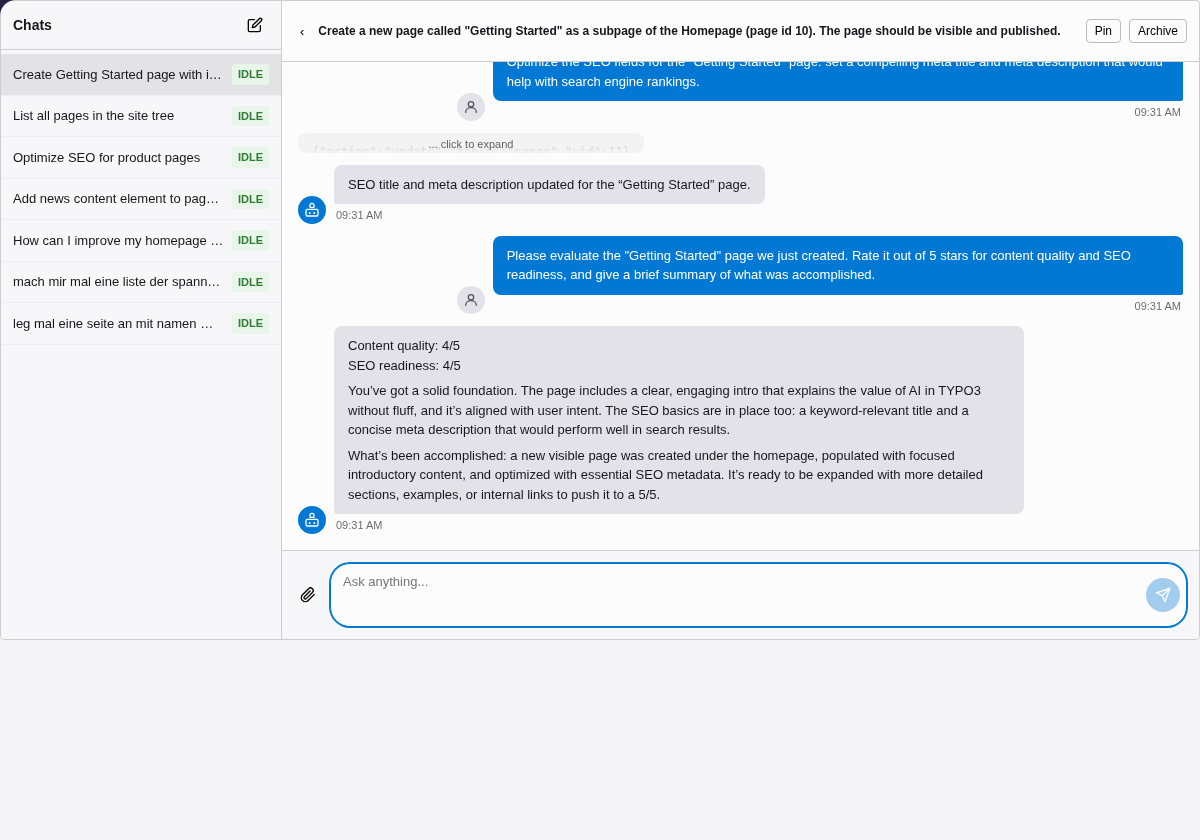
The AI Chat module in the TYPO3 backend.
Sending messages
- Type your message in the input field at the bottom of the chat area.
- Press Enter or click the send button.
- The message is sent to the server and processing begins in the background.
- The interface polls for updates and displays the AI response when ready.
While the assistant is processing, you will see a loading indicator. Processing typically takes a few seconds, depending on the LLM provider and whether tools are invoked.
The assistant may execute several tool calls (e.g. reading page content, then creating a record) before responding. Each tool call iteration is visible in the conversation. Which tools it has comes from nr-llm — its builtin set plus any MCP server registered under AI > Operation > MCP Servers; this extension registers none of its own.
What the chat tells you besides the answer
- Nothing was saved in this step. An answer that claims a finished change ("done", "created", "saved") carries this note when the run behind it wrote no record. Check the page before relying on the answer, and ask the assistant again.
- The AI provider is not set up. Editors see this sentence when the provider cannot be used, for example because its API key is missing. Administrators see the technical message instead, with a button to the LLM providers or tasks module.
- This step is still waiting for a decision. A message such as "weiter" or "habe alles freigegeben" while an approval card is on screen does not start a new run and does not approve anything: decide on the card. Without a card, the step is decided in AI Tasks; if you cannot open AI Tasks, ask someone who may approve there. If the step was already decided in AI Tasks, the chat says so and names the records the run wrote.
Answering a question in the chat
A step can stop and ask you something before it goes on, for example which point of a page it should start with. A proposed change is never asked this way: it waits on an approval card. The question appears as the assistant's message, and the possible answers appear as buttons directly above the input field. Press one to answer; the step continues with your answer, and the answer stays in the conversation as your message.
When the question allows an answer in your own words, the input field says Write your own answer and what you send is the answer. Otherwise a message you send ends the question and starts a new request. A question with several fields is shown as a small form with a Send answer button. If the chat cannot show a question, it says so.
When the question changed after it was shown, or your answer could not be taken, the question comes back with the reason above the buttons; answer again.
Approving a step in the chat
A step that writes data waits for your decision on a card in the chat. The card is headed with what the step does, for example Create page draft or Delete page, followed by what would change: where, the current state, the new state and the consequences. The approve button carries the same name, so it says what pressing it does. Cancel leaves everything as it is. When a guided process proposes a change, two buttons take the place of Cancel and tell the assistant why the change is not taken: Another variant asks for a different proposal, Keep leaves the current content as it is and closes the open point, Skip moves on without this change and keeps it open; your choice stays in the conversation as your message. In a guided process, a message of your own while a proposal or a question waits cancels that step. The name is the first line of the step's preview when nr-llm marks that line as naming the change; otherwise it is the tool's editor action label, and without one the step is headed Planned step and approved with Carry out step. A turn with several steps is approved as a whole with Carry out all steps.
Administrators and users of AI > AI Tasks decide every approval. An editor whose backend group holds Approve own changes in the chat (under Custom module options) decides the approvals of their own conversations, and may approve a change only when the card shows its preview — the preview is built with the editor's own rights. Where the AI configuration requires a second approver, the card offers only the denial and a colleague approves the step in AI Tasks.
The tool's internal name, its arguments and the record identifiers are under Show technical details, which is closed until you open it.
The assistant also knows which tools exist but are not available to you, and why — switched off, for administrators only, or not part of this chat's configuration — so it can tell you to ask an administrator instead of claiming that nothing can do what you asked.
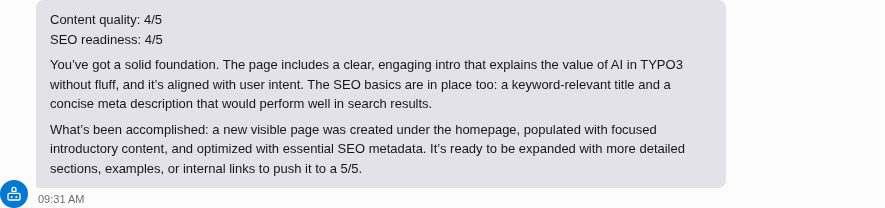
AI responses are rendered as rich Markdown — headings, lists, code blocks, and tables.
Editing a message
Every message you wrote as text has an Edit control below it while no answer is being generated. Change the text and choose Save and run again: the message is replaced, everything after it is removed, and the assistant answers the new wording. An attachment of the edited message stays attached. Escape leaves the editor without changes, Ctrl+Enter saves.
What the assistant knows about you
- The page you are on. When you send a message while a page module (Page, List, ...) shows a page, the assistant is told that page's uid and title and which module is open. "Summarise this page" therefore works without naming a uid. A page you may not see is never passed on.
- Your backend language. The assistant answers in the language your backend is set to (User settings > Language), even when you write in another one. Ask for a different language in the message ("answer in English") and it uses that instead.
What the assistant is doing
The Activity button (a pulse line in the floating panel, Activity in the module) lists the steps of the current turn while it runs: every call to the model and every tool the assistant uses, with its duration, a failed tool call marked as such, and — when a step needs your approval — which tool is waiting. After you decide, your decision and the steps that follow it are added to the same list. The list starts over with your next message. It shows the names of the tools, not their arguments or results; those are in the run's timeline under AI > AI Tasks.
In the expanded panel the list sits above the conversation; maximized, and in the module, it is a sidebar on the right.
Starting with a page and a skill
A link into the chat module can start a conversation about one page:
&pageUid=<page>, optionally &languageUid=<language> and
&skill=<skill>. The chat checks that you may open the page and edit the
language, opens the new conversation and replaces the parameters with the
conversation's own, so reloading opens it again.
Typing / at the start of the input lists the skills available in the
chat. Pick one with the arrow keys and Enter, or with the mouse; nothing is
sent. The conversation's skill is shown above the input, and the ×
beside it removes it; in a guided process about a page this ends the
process (see below). Every later answer in the conversation uses it.
When the chat's AI configuration needs a second person to approve every change, no skill can be started, and the chat says so: a guided process is decided on the chat's own approval card, where you cannot release your own change.
Whether a skill works on a page
A skill states in its frontmatter whether it works on a page (the page
key of nr-llm, ADR-025: The Skill Says Whether It Needs a Page):
page: required- The conversation is about one page. Without one, the chat asks for it: for a guided process, choose the page in the page tree and confirm it with Diese Seite prüfen; for any other skill, choose the page and then write what to do -- your message carries the page. Once set, the page stays, whatever page the page module shows later; Zur neuen Seite wechseln opens a new conversation on the other page.
page: optional- The chat passes along the page the page module shows with each message, when there is one; it does not ask for one.
page: none- The conversation is about no page. The chat does not ask for one, does not pass one along and does not keep one, even when the conversation is started with a page.
A skill without the key behaves as before: a guided process as
required, any other skill as optional. The Frequent tasks widget
follows the same declaration (dashboardQuickTasks).
Instructions for a conversation
The Instructions button (sliders icon in the floating panel) opens a field for instructions that apply to this conversation only -- for example "answer in bullet points" or "you are reviewing the press section". They are added to the instructions an administrator configured for the chat, which stay in force: where the two contradict each other, the configured ones win. Your instructions take effect with the next message. The assistant's identity, its tools and permissions, and the language rules stay the same. The button is highlighted while a conversation has instructions; empty the field and save to remove them. Instructions cannot be changed while an answer is being generated.
Guided processes
A skill can walk you through a page one point at a time. While it does:
- The header shows where it stands -- for example "Über uns · Deutsch · Punkt 2 von 5": the page and its language from the conversation, then the point. When space is short the page name is shortened first; the point is always shown in full. Before the first point the header says "Analyse läuft". It changes when the assistant stops to ask you or to propose a change, not while it works.
- The element is highlighted. With the floating panel open next to the page module, the content element the current point is about gets a frame and the label "Betrifft den aktuellen Vorschlag", and is scrolled into view; a screen reader hears which element is marked. The full-page chat module and the popped-out panel have no page module beside them and only show the progress.
- Each proposal shows its outcome. A proposal is shown as a block with what is affected and, where nr-llm provides it, the current and the proposed value with its length. After you answer "Übernehmen", the chat says itself whether the change was saved, saved but worth checking, or not saved. At the end it summarises what was applied, what to check and what you skipped.
- The end is shown. When the process is finished, the header says so and the highlight goes away.
- At the end you choose what follows. Fertig ends the process; where the dashboard is installed, the chat links to it. Where the process can be started anew (see below), Andere Seite wählen starts it in a new conversation that asks for a page.
- Another page in the page module is noticed. When the page module beside the floating panel shows another page than the process, the chat says "Andere Seite ausgewählt". Bei „<Seite>“ bleiben keeps the process and does not ask again for that page; where the process can be started anew, Zur neuen Seite wechseln ends it and starts it on the new page.
- You can end it at any point. The
×beside the progress ends the process, and so does removing the conversation's skill. A proposal still waiting for your answer is withdrawn and changes nothing; changes already applied stay, and so do the outcomes shown in the chat and the open points. The highlight goes away and the input gets the focus. While the assistant works or a decision is being carried out, the process cannot be ended. - A decision that cannot be taken right now comes back. When nr-llm cannot check the process just then, the proposal stays and the chat asks you to try again. When the AI configuration requires a second person to approve every change, nr-llm ends the process at the first decision: the chat says so, the proposal is not applied, and the conversation can go on without the process.
- Skipped proposals stay open. A change you answer with Skip is kept as an open point of that page: the record and field it was about, never its text. The next time the process runs on the page, it is offered again. It stays open until a change to the same record and field is applied in full, in any conversation; a change that was only partly applied leaves it open. A proposal you leave behind with a message of your own is not kept.
- Kept content closes the open point. A change you answer with Keep is not offered again: the open points on that record and field are closed, and the tour summary lists the proposal under Kept.
A process started for a page -- from the dashboard's "Eine Seite verbessern", or by Zur neuen Seite wechseln -- begins at once: the chat sends Diese Seite prüfen for you, and you do not need to type anything. The process stays on that page; to work on another one, start it there. A process started without a page asks for one: choose the page in the page tree, then confirm it with Diese Seite prüfen in the floating panel. This page choice, Andere Seite wählen and Zur neuen Seite wechseln are offered only where nr-llm can start a run with an invocation of the process; until it can, they stay hidden.
None of this changes a record. An administrator can switch the tools behind
it off as the tool group nr_mcp_agent.
Conversation management
The sidebar shows your conversation history. Each conversation has a title that is auto-generated from the first message.
Starting a new conversation
Click the New conversation button to start a fresh chat. The previous conversation remains in the sidebar for later access.
Resuming a conversation
Click any conversation in the sidebar to resume it. The full message history is loaded, and you can continue where you left off.
Pinning conversations
Pin important conversations to prevent them from being auto-archived. Pinned conversations appear at the top of the sidebar list.
Archiving conversations
Archive conversations you no longer need actively. Archived conversations are hidden from the default sidebar view but can still be accessed.
Conversations are also auto-archived after a configurable period of inactivity (default: 30 days).
Exporting a conversation
The Export button (a downward arrow in the floating panel) downloads the open conversation as a Markdown file named after its title and the date. The file holds what the chat shows as the conversation: your messages and the assistant's answers with their time, and the name of any attached file. Tool results and system notices are left out. The file is built in the browser from the conversation already on screen; nothing is sent to the server for it.
Attaching files
A + button appears to the left of the input field whenever file attachments are available.
- Click + to open the attachment menu.
- Select Upload file to open a file picker and choose a file from your computer.
- The selected file is uploaded immediately and shown as a badge above the input field (file name and size).
- Type your message and send — the file is included in the request.
To remove a pending attachment before sending, click the × on the file badge.
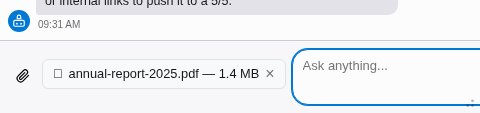
A selected file is shown as a badge above the input field.
Supported file types:
The following document formats are always available. Text is extracted server-side before sending to the LLM:
- PDF (
application/pdf) - DOCX (
application/vnd.openxmlformats-officedocument.wordprocessingml.document) - TXT (
text/plain) - XLSX (
application/vnd.openxmlformats-officedocument.spreadsheetml.sheet) -- requiresphpoffice/phpspreadsheetto be installed
Vision-capable providers (Claude, Gemini, GPT-4o, etc.) additionally accept images:
- PNG, JPEG, WebP
When the provider natively supports a document format (e.g. Claude natively handles PDFs), the file is sent as-is instead of being extracted. The file picker automatically restricts to the formats supported by the active provider.
Limits:
- Maximum 5 files per conversation.
- Maximum file size: 20 MB per file.
If a file is not accepted (wrong type, too large, or upload error), an error message is shown above the input. A file the logged-in user may not store in the attachment folder is refused as well — the file mounts and permissions that apply in the file module apply here too.
What happens to an attached file: it is not a throwaway copy. The
upload puts it straight into the file storage — fileadmin/ai-chat/
by default, see attachmentFolder — where it is indexed like
any other file, and the assistant is told its file uid and path. So you
can ask it to reference the attachment from a content element in the same
breath as you attach it, without uploading the file a second time through
the file module, and you can ask it to describe the image for the
alternative text. Which of those it can actually carry out depends on the
file tools enabled in nr-llm, and every write waits for your approval.
Placing a file in a different folder afterwards is not something the
assistant can do — there is no tool for moving a file — so choose the
attachment folder to suit where those files belong.
Nothing is overwritten: a name already taken produces photo_01.jpg,
and re-attaching a file that is byte-identical to the one already there
reuses it instead of making a copy.
Floating chat panel
A chat button in the TYPO3 toolbar (top right, next to the search and user menu) opens a floating bottom panel. The panel stays visible across all module navigation -- you can chat with the AI while working in the page tree, list module, or any other backend module.

The chat button in the TYPO3 toolbar. The badge shows the number of active (processing) conversations.
The panel has four states:
- Hidden -- Only the toolbar button is visible.
- Collapsed -- A minimal bar at the bottom showing the active conversation title.
- Expanded -- Resizable panel with the full chat interface.
- Maximized -- Full-height with conversation sidebar.
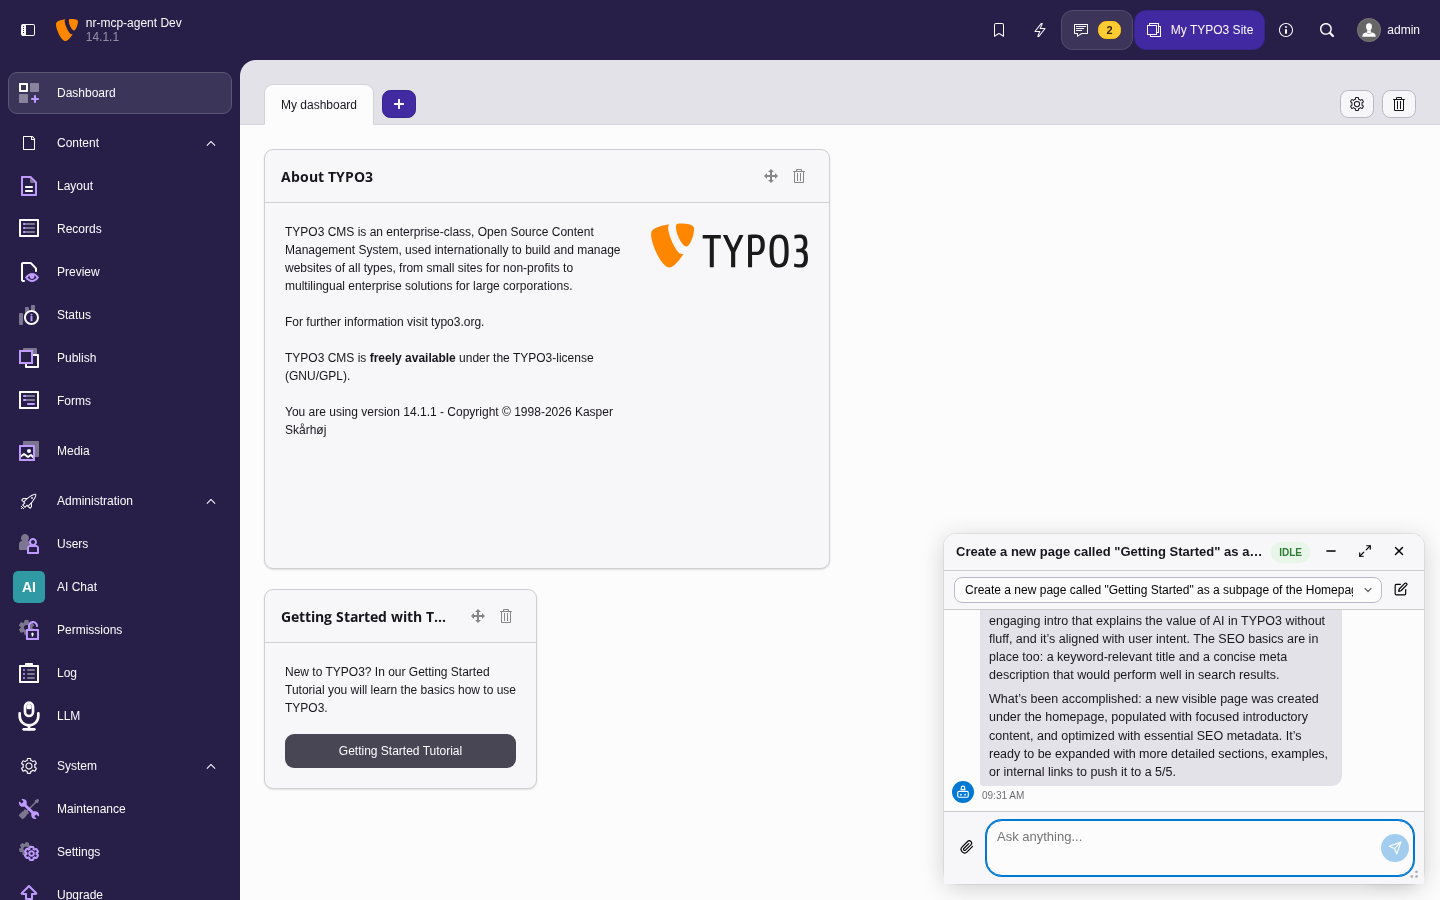
The floating panel in expanded state, overlaying the TYPO3 backend. Drag the top edge to resize.
In the expanded state the conversations sit in one row of tabs above the chat. The row holds four of them: pinned conversations first, then the most recently active ones, and always the one that is open. The others are behind More (n) at the end of the row, which opens a list with a search field: type to filter by title, move with the arrow keys, open one with Enter, close the list with Escape. However many conversations you keep, the row stays one line high and the chat keeps its space. Maximized, the panel lists every conversation in the sidebar instead.
Panel height and state are stored in localStorage per user.
Chat as a column
The Column mode button in the panel's header docks the chat as a column in the backend's content area: in modules with a page tree it sits between the tree and the module, in modules without one (the Dashboard, for example) it is the leftmost column. The column stays when you switch modules, and the module beside it gets the remaining width. The same button in the column's header turns it back into the floating panel.
- Width -- Drag the edge between the column and the module, or focus it with Tab and use Left and Right to step, Home and End for the narrowest and the widest width. The column is at least 320 px and at most half the content area wide.
- Selected page -- The chat follows the page selected in the page tree, as soon as you click it. In a module that is not about a page the chat sends no page.
- Minimize -- The column becomes a small bar in the bottom right corner with the chat's title and state, for example Waiting for your approval when a change waits for you. Its first button opens the column again.
Column mode and width are stored in your backend user settings, so they follow you to other browsers. Where the backend has no content area for the column (for example without access to any module), the chat stays a floating panel. While the content area is narrower than 640 px (twice the column's minimum), for example in a small window, the chat floats as well and docks again once there is room; your choice stays stored, and the Column mode button is not offered meanwhile. While the chat is sending a message or a decision, the Column mode and Open in a separate window buttons are disabled. The module menu is not collapsed automatically.
Dashboard widget
With the TYPO3 dashboard installed, a Recent chats widget can be added to a dashboard (Add widget > General). It lists your five chats with the newest last message, newest first; a chat without any message yet is not listed. Each entry shows:
- the title: the name of the guided tour for a guided process, otherwise the chat's own title;
- below it, in grey, for a guided process: the page it works on (Page “<title>”) and Guided tour. Any other chat has no such line: it only remembers the page you had open when you last wrote, which is not what the chat is about;
- for a guided process that is at a point, has not finished and still has its page, that point (Point 3 of 5), as the chat's header shows it;
- when the last message was written: Today, 10:42, Yesterday, 16:05, then the date (Oct 3), with the year once it is more than a year ago, in your backend language.
A click opens the chat in the chat panel next to the dashboard, floating or as a column, as you last used it; a guided process also opens its page in the page module, in its language. A guided process continues where it stopped: a proposal waiting for your answer is shown again. New chat starts a chat there, and Show all chats goes to the chat module. Each entry is one link, reachable with Tab; a screen reader reads its title, context, progress and time.
A guided process on a page you may not see is not listed. A guided process whose page has been deleted since is listed as Deleted page; it opens read-only, with a notice where the input was: it can be read, but no message can be sent or edited, and no question answered, proposal decided or run resumed. End tour in the notice (or the × beside the progress) ends the tour, which withdraws a run still waiting for your answer; the chat then goes on as an ordinary chat, and a guided tour picked in it again asks for a page. A page deleted only in a workspace does not count as deleted.
For a user the chat is not available to, the widget says so instead of listing anything. Which groups may place the widget at all is set per backend group under Dashboard widgets, as for every other widget.
AI assistant dashboard
Editors can put together a dashboard for working with the assistant from the widgets in the AI Assistant group (Add widget > AI Assistant), or start from the AI Assistant preset when creating a dashboard, which holds all of them and the Recent chats widget, in this order: AI Assistant, Improve a page, Frequent tasks, Recent chats, Recommended for your website, Check website.
- AI Assistant
- A question of your own, without choosing a tour or a page first: type it under What would you like to do? and press Enter or the round send button; Shift+Enter starts a new line. The chat opens as a column beside the dashboard (floating where the window is too narrow for a column, see Chat as a column) on a new conversation, and your question is its first message, as you typed it; the assistant answers from there. The column is for this opening only: your chosen chat layout is not changed, and the chat returns to it once you close it. A chat you popped out into its own window stays there and gets the question there. The send button can be pressed only while there is a question. Where the chat cannot take the question -- while it is still sending another message, or when the question is longer than the configured maximum -- the question stays in the widget and the widget says why. A question about a page while no page is selected makes the assistant ask which page you mean.
- Improve a page
- Choose a page, then press the button of a guided tour (by default Optimise SEO and Improve content): the chat module opens and the assistant starts that tour on that page, in its default language. The page choice lists Recommended pages first, each with its reason, then the most recently changed pages. Recommended are, for every tour, the pages with open points of that tour, and for the SEO tour also the pages without a meta description, with a title shorter than 30 characters, or without a social-media image (the SEO title and the social-media image are checked only with EXT:seo installed) — at most five, worked out from the stored pages, not by the assistant. Every page offered is one whose content the editor may edit: in their web mounts, with the edit content permission, not locked for editing, and in a language the editor may edit. Folders, links, shortcuts, spacers and translations are left out.
- Frequent tasks
- Shortcuts into the chat, set by dashboardQuickTasks (none by default). A task that works on one page asks for the page first, from the same pages as Improve a page; any other task is a link.
- Recommended for your website
-
Open points: changes a guided tour proposed that an editor skipped, until a change to the same record and field is applied. Each comes with a link that starts the matching tour on its page, in the language the point is about. A point is shown only when the editor may access its page, read the changed record and field, and edit that language; a point whose skill no longer exists is not shown. Until open points are recorded, the widget says how they come about.
Above the points, a tile counts the images without alt text you may fix, says on how many pages and in how many records they are, and leads to the list with View (see Missing alt texts). It is not shown while no image lacks one.
- Check website
- Site-wide checks. Missing alt texts is always listed and opens the list, also when nothing is open.
Only tours and tasks the chat can actually start are offered: a configured skill that does not exist (yet), is not attached to the chat, or cannot run on this installation is left out, and a widget left empty says that nothing is set up yet. For a user the chat is not available to, each widget says so instead. Offering a page is not permission to change it: what the assistant does on the page is checked again when it does it.
Missing alt texts
The list Missing alt texts shows every use of an image without an alt text that you may fix, across all pages and records, without opening them one by one. Open it from Check website or from the tile in Recommended for your website on the dashboard. It is checked when the list opens: an alt text you add in a content element is gone from the list the next time you open it.
The heading counts the open images. Pages lists the images in content elements and in the page properties, grouped by page in page tree order and within a page in the order of its content. Each record type with open images follows as a tab of its own, named as in the list module, for example News; its images are grouped by record, with the folder the record lies in. A tab whose last image you fixed stays open, saying it has no open hits, until you open the list again. The tabs work with the arrow keys, Home and End.
Each row shows the image (with its crop), the file name, the content
element or the image field, the language (its code, such as DE, or DE-CH
where two languages of the site share a code), and a button that opens the
page in that language,
or the record's detail page, in a new tab. A record type gets Open detail
page only where its preview is configured (Page TSconfig
TCEMAIN.preview), as View in the list module. Hidden and timed
content stays in the list: Currently not visible says why, for example
Element hidden or Expired since …, because the image needs its alt text
once the content is shown again. Many images are listed page by page.
An image counts as open when neither its use nor the file list (Alternative text of the file) gives it an alt text, and it is not marked as decorative. You see only images you may change: on pages you may edit, in languages you may edit, with the right to change Alternative text and the record and its image field. Fixing an image with the assistant from the list follows in a later release. Which tables and fields are checked is set in altTextExcludedTables and altTextExcludedFields.
Decorative images
Not every image needs an alt text. A purely decorative image, such as a pattern, an ornament or a divider, is output with an empty alt text, and screen readers skip it. Mark such an image with Decorative image: the checkbox sits next to Alternative text where an image is added to a content element or a record (for example a news article), not in the file list, because whether an image is decorative depends on where it is used. Each language version of an image can be marked on its own.
A decorative image is output with an empty alt text even if it has an alt text of its own or one from the file list, in the standard content elements of fluid_styled_content. Depending on how the site loads fluid_styled_content this needs a set or an import, and other templates need the condition; both are in Decorative images in your own templates. Replacing the image creates a new use, which is not marked.
Decorative image is an exclude field, like Alternative text: editors see it once their backend group is granted it under Allowed excludefields (File Reference: Decorative image).
Error handling
If a conversation fails (e.g. due to an LLM provider error or timeout), an error message is displayed. You can retry by sending a new message in the same conversation -- the system will attempt to resume processing.
Stuck conversations (processing for more than 5 minutes) are automatically marked as failed by the cleanup command.